UI Series
Live Viewer Deep Dive
Version 1.0, Updated Feb 2024 using Octane 2023.1.2 and Cinema 4D 2024.2
About This Guide
The Live Viewer is the heart of Octane Render, and how we’ll be interacting with Octane in C4D most of the time. Not only does it give us a live view (hence the name) of what the scene is going to look like, but it’s also where nearly everything Octane-related is housed in C4D. This guide does a deep-dive exploration into the Live Viewer itself and explores all the options we have at our disposal.
The information here used to be part of the Quick Reference Guide, but wasn’t so quick, so it got split out into its own thing (and rewritten to some extent to update it to 2023.1).
PDF
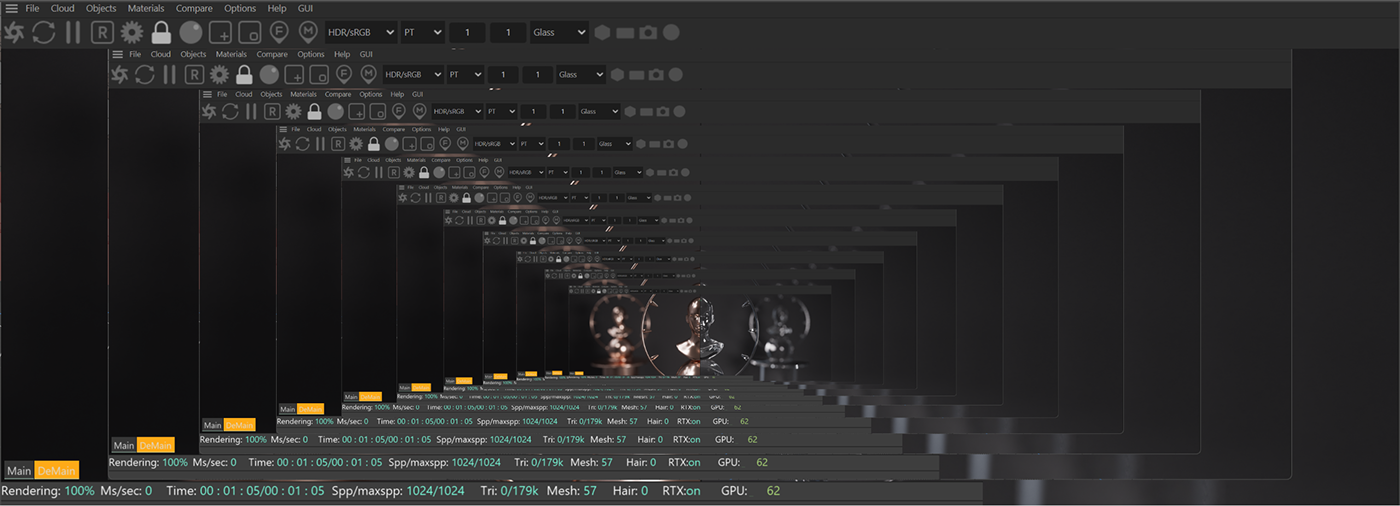
Live Viewer Anatomy

At the very top is the title bar. This tells us which version of Octane we’re using and how many days are left on our subscription.
Under that is a menu bar with File, Cloud, Objects... etc. This is where we create Octane Materials, Lights and Cameras, as well as a bunch of other special objects like Scatter and Fog. There are also import/export options here, the ability to send to RNDR, and a bunch of options that we’ll touch on later.
Below that is the command bar (button bar/icon bar). These are essentially shortcuts to the most-needed commands while we’re rendering.
Beneath that is the render area. This shows us the rendered scene from the viewpoint of the active camera. We can navigate in this window using Alt (or Opt)-LMB/MMB/RMB, drag in materials to place on objects, and a few other things.
In the render area, there’s a tiny bit of orange text at the top that gives us some statistics that we can use to troubleshoot or optimize a tricky scene. To the far right of that is some faint gray text that tells us the current resolution and zoom level we’re not already viewing the render at 100% (if it’s scaled or the Lock Resolution button isn’t on).
In the bottom left corner there are info overlays that tells us which GPUs are active and what they’re doing. We can left click anywhere in the live viewer area to toggle these overlays on and off, or right-click and choose “Toggle Info”.
To the right of that are several small gray boxes, one of which is highlighted orange. This tells us what the active render pass is. The most common ones are Main (unaltered render), DeMain (denoised render), and Noise (if we’re using Adaptive Sampling). As we add more AOVs, we can click the little boxes that show up to see them isolated.
At the very bottom is the render status bar. This tells us how long the render will take, whether it’s done or not, the number of samples rendered, and a few other things.
If we right click in the live viewer area, we get a contextual menu with several options and shortcuts.
The Command Bar
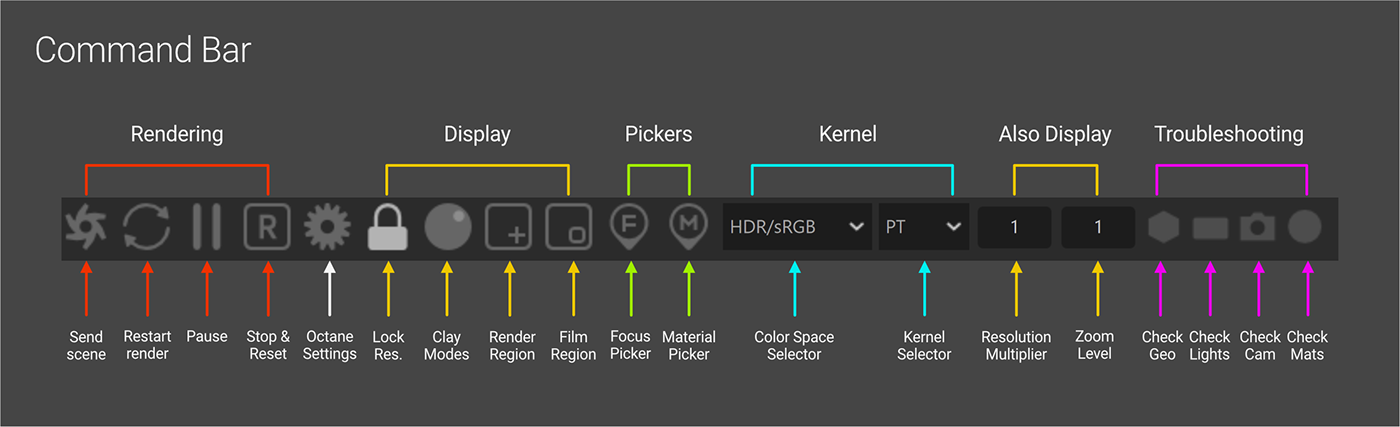
This bar has all of the commands we’d want to quickly access while we’re working. They’re broken up into a few categories.
Rendering Commands
There are two things that need to happen before we see a final image. First, Octane needs to compile all the data in the scene, package it up, and send it to the GPU. Then it can actually render the image, which it does in passes known as ‘samples’. Once this rendering stage starts, the Live Viewer window starts updating to show the effects of each bunch of passes. The render stops automatically when the Max Samples value we set in the Kernel settings has been reached.
Important: Do not interrupt the Live Viewer while it’s preparing the scene to send to VRAM (before rendering) - this is a great way to crash it. Once it starts rendering, we can interrupt it all we want.
The Send Scene button (looks like an Octane logo) starts this entire process. It does all the pre-prep, sends a fresh copy of the scene to the GPU, and starts rendering as it’s there.
The Restart Render button skips the first stage, uses whatever info is in VRAM already and just starts rendering from the first sample. This is especially useful if we have a lot of pre-prep time and we just want to tweak something that doesn’t require reloading all the geo.
The Pause button pauses the rendering stage at whatever sample it’s up to, and then when we hit it again it resumes from where it left off. This is useful for getting an idea of how many samples we need in our final render, or if we want to do something else to our scene that doesn’t require rendering and we don’t want it to continually update.
The Stop and Reset button stops the render and clears all the data from the GPU, but doesn’t restart the render like the Send Scene button does. Most of the time we won’t be using this, but sometimes it’s helpful in troubleshooting.
Octane Settings
This is just a shortcut that quickly brings up the Kernel settings window. There’s a whole guide on this, so it won’t be covered here.
Display Commands
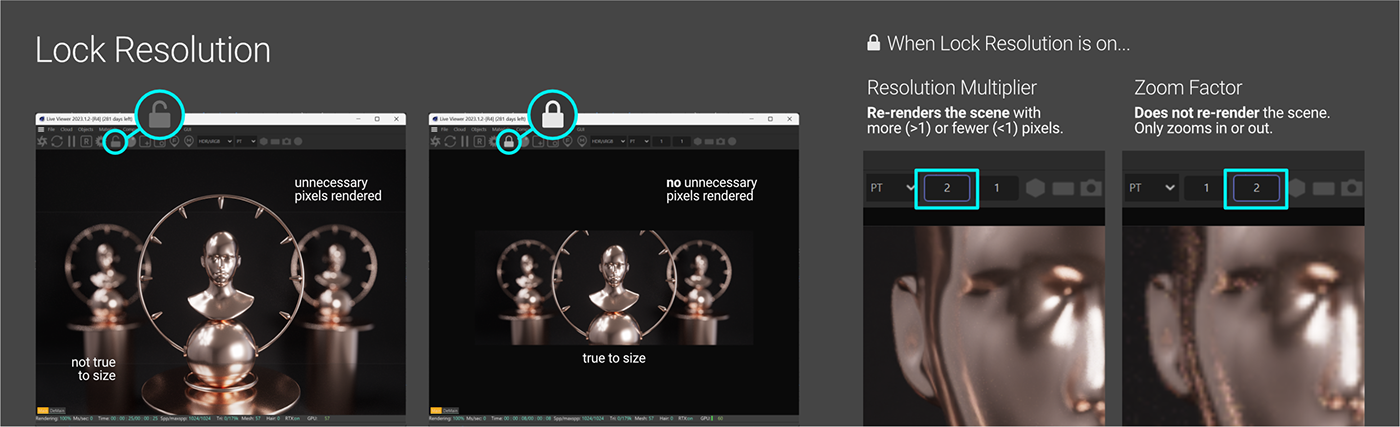
The Lock Resolution button is super useful. When this is off, Octane renders everything in the Live Viewer’s render area regardless of the aspect ratio or size. If we resize the Live Viewer window, it changes how much of our scene renders. There are a few cases where this is useful, like if we’re trying to compose our scene using Depth of Field and want to see more than our final frame, but it doesn’t give us a good indication of how long the final render will take because it’s not true to size and rendering stuff outside of the final frame area.
Hitting the Lock Resolution button will show a 1:1 view of our scene. If our render settings are at 1920x1080, it will render 1920 pixels across by 1080 down and nothing else. If our window is smaller than our render, it will only show us part of it and we’ll have to pan around (or use the zoom factor) to see it all. Because it’s rendering every pixel in the final frame - no more, no less - we can get an accurate idea of how long the final frame will take to render.
Important: If we’re wanting to save frames from the Live Viewer directly (without going through C4D’s Picture Viewer), we definitely want to make sure Lock Resolution is ON, otherwise we’ll save out whatever we’re seeing in the Live Viewer rather than the frame size we set in the render settings.
When the Lock Resolution button is active, two new fields appear in the icon bar, and they both default to a value of 1. The first one is a resolution multiplier. If our render settings are set to 1920x1080 and we type in 0.5 (50%), it will re-render the scene at 960x540 which will be faster (rendering fewer pixels). If we type 2 (200%), it will re-render at 3840x2160 which will be slower (rendering more pixels). If we save the image as a PNG or EXR from the Live Viewer at this point, it will be in the new resolution (960x540 or 3840x2160 in this case).
The second box is the zoom factor. It works the same way as a magnifying glass does in a 2D app. If we type 0.5 here, it won’t re-render, it’ll just zoom the window to 50% so we can see more of our scene if it was clipped off. If we type 2 here, it also won’t re-render, it’ll zoom in to 200% (things will look less sharp like it does in a 2D app). This is useful for zooming in on a portion of the render to have a better look at an artifact, or zooming out to fit the render to our window when we adjust the interface. If we save the render from the Live Viewer while it’s zoomed, it will ignore the zoom factor and just save it in the resolution we had already set (so 1920x1080 in our example regardless of the zoom factor).
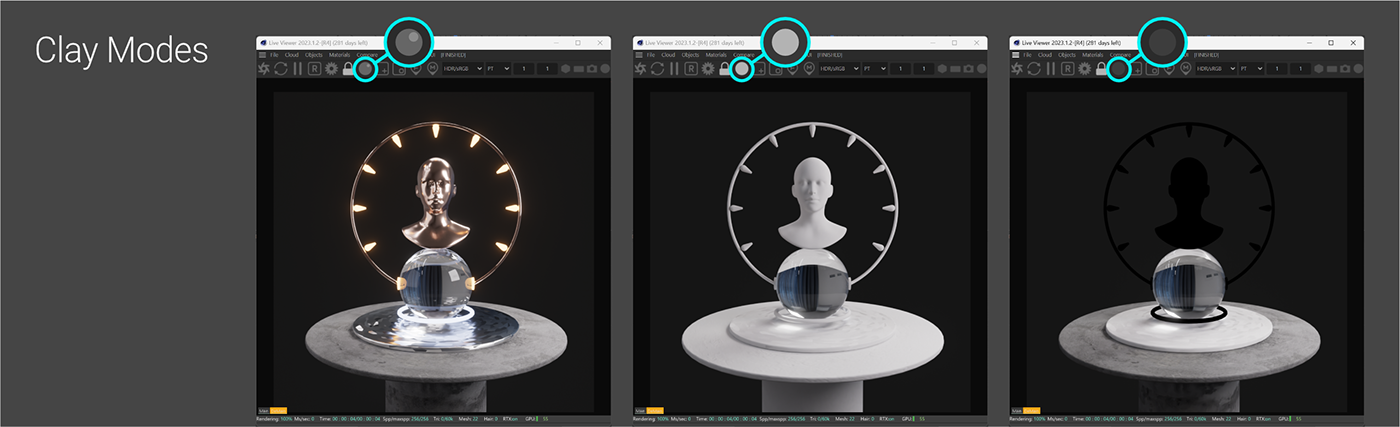
The Clay Modes button has three different states we can toggle through. This is useful for troubleshooting or getting an idea of the effect the materials are having on the scene.
The state with the reflective looking sphere shows what we’d normally expect - all material properties are turned on. The flat white circle state removes all textures and turns all the materials to a diffuse white EXCEPT any that have transmission. The flat gray circle state keeps the albedo color and textures, but removes emission and reflective properties (metallic/specular).

The render region and film region are for rendering a small part of our composition.
Render Region stops rendering everything outside the box we draw, and keeps increasing the samples within the selected box (past the Max Samples we set) so we can focus in on problem areas and see how many samples we need to resolve them. This is useful as a diagnostics tool.
Film region blacks everything out and then only renders the portion of our scene in the box up to the Max Samples we set. This is good for adding a patch to an existing render or just knocking out quick vignettes or thumbnails or something that doesn’t require a full render.
Pickers
Pick Focus lets we click anywhere in the Live Viewer and set the focal point of the active Octane camera. We can also pick focus by right-clicking and choosing “Pick DoF” or Ctl-MMB. Pick Material lets us pick any object in the Live Viewer and it will highlight the material assigned to it in the Material Manager.
Important: Both of these are modes, and as long as either one is on, other interactions in the Live Viewer Window (like hiding info overlays) will not work properly until we remember to turn them back off.
Kernel Options
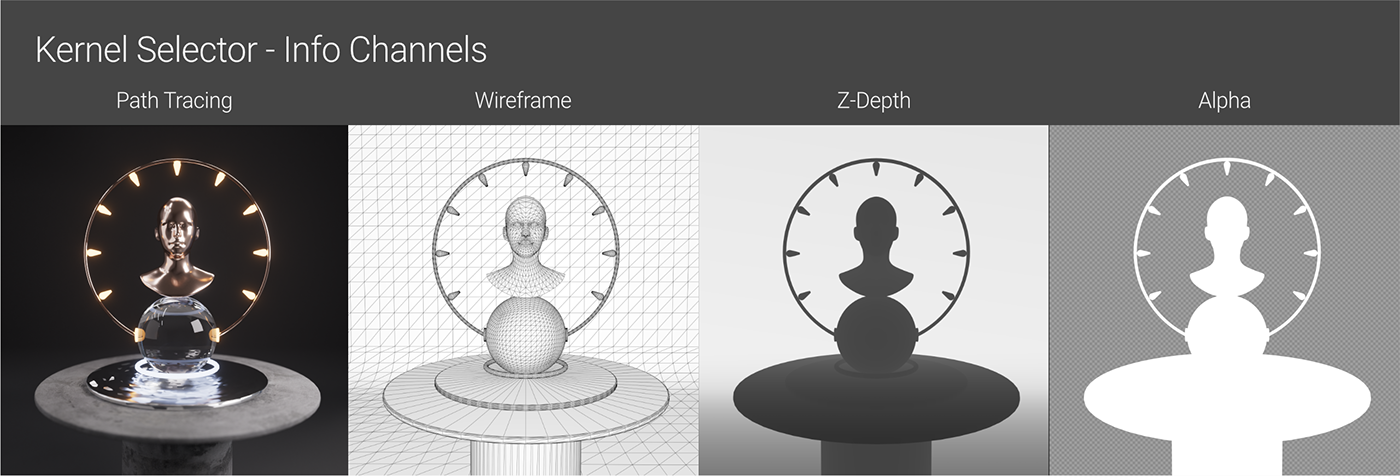
The Kernel Selector lets us choose between the different kernels. This is the same as going into the render settings and choosing a kernel there, and will change the active kernel and affect the final render. We can also directly view different Info Channels here like z-depth and wireframe.
The Color Space selector is confusing. Color spaces in general are confusing, so it’s good to get a handle on that before touching this. The important thing to know is that as of this writing, Octane’s Live Viewer window is only capable of displaying 8-bit sRGB regardless of the monitor’s capabilities or settings, so ACES2065-1, ACEScg and HDR/Linear sRGB don’t show accurate results and should not be used.
HDR/sRGB is the default, but it has to convert down to LDR anyway because - as we just learned - Octane’s Live Viewer window is only capable of displaying 8-bit (LDR) sRGB. If we switch the selector to LDR/sRGB, we’ll see the same result, and it may even save a little VRAM.
Either HDR/sRGB or LDR/sRGB will correctly show ACES tone mapping (the checkbox in the Imager tab of the Octane settings) if we’re using it.
The only time we’d really want to change the Color Space Selector is if we’re using an OCIO configuration like AgX - then we need to make sure it’s set to the correct OCIO look and view so we see our colors properly. This is covered in detail in the Color Management in Octane guide.
Fine Tuning and Troubleshooting Buttons
The four check buttons on the far right tell Octane whether to update the geometry, lights, camera and materials whenever something causes the Live Viewer to update.
Turning these on and off can be useful for diagnostics if we’re getting a lot of crashes or slowdown due to any one of those four things. We need to remember to turn them back on though, otherwise the Live Viewer will act weird.
There are specific menu toggles that let us turn on/off the different types of motion blur to help troubleshoot scenes as well - these are in the Options menu of the Live Viewer.
Menu Bar
While most of the important commands are found in the Commands bar, there are some other interesting and useful things squirreled away in the menus.
Import/Export
The File menu lets us save what we rendered in the Live Viewer in a variety of ways (without having to go through C4D’s Picture Viewer). Save Image As… is the fastest way to just save off a single frame in PNG or EXR format. Save image sequence will render each frame and save it. This uses the Frame Range in C4D’s Render Settings (Ctl-B/Cmd-B). Save Render Passes as EXR or PSD is for saving a multi-pass image we set up using the AOV system.
There are also commands here to interact with Octane Standalone’s native file format: orbx. An orbx is a file that contains all scene data, textures and assets into one convenient chunk so it can be opened in Octane Standalone or sent out to be rendered in the cloud.
The Cloud menu lets us send our scene directly to RNDR which is Otoy’s cloud rendering service.
A/B Comparison
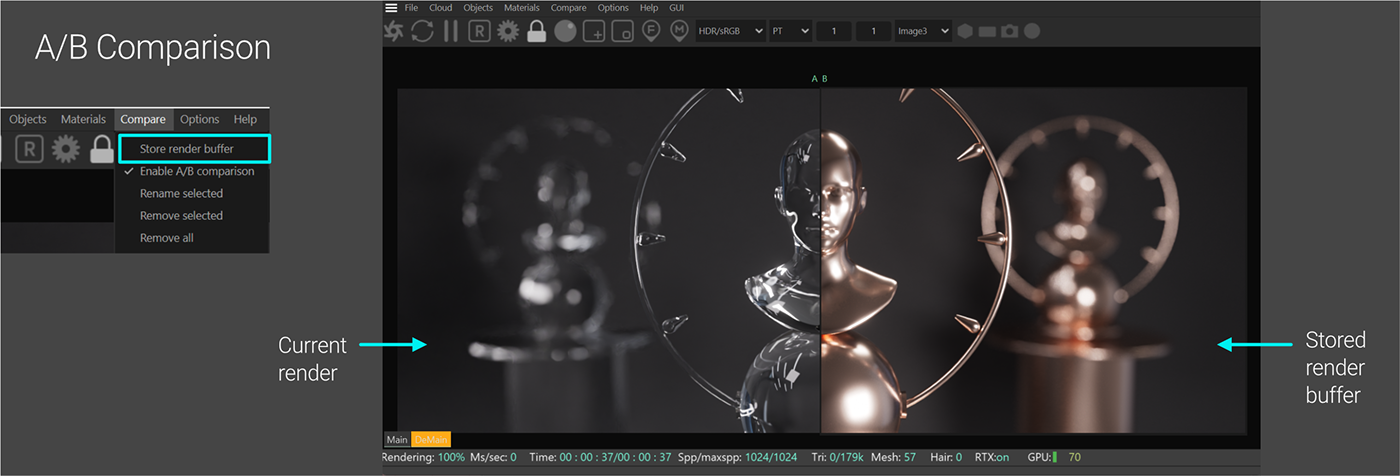
The Compare menu lets us store renders and do an A/B comparison with the current render directly in the Live Viewer. Once a render is done (or even before), we can go into the Compare menu, and choose Store Render Buffer (basically store the current image), then turn on the A/B comparison option and start editing the scene to compare it to what we stored. If we grab the slider in the middle we can wipe left or right to see more or less of the stored image.
As soon as we store a buffer, a new dropdown appears in the Command Bar to the right of the Zoom Factor. This contains all the images we stored (which we can rename in the Compare Menu), so we can cycle through them to A/B test with the current render.
Possibly Important: What we can’t do is save any of the stored buffers once we store them, so we need to make sure we export right after we render if we’re planning on keeping any of them.
Options Menu
The options found here are good for troubleshooting and speeding things up while we’re doing look development. For example, if motion blur is causing issues while we’re scrubbing around the timeline and trying to just adjust textures, we can temporarily disable it in the live viewer using the Interactive Motion Blur menu in options (just remember to enable it later).
The Update Check menu does the same thing as the toggle buttons at the right of the command bar. We can disable the camera, materials, lights, and geometry when the scene updates (again, we need to turn this back on after we’re done).
Subsampling is used when we have either a slow GPU or a super complex scene that slows down navigation while the live viewer is running. While we’re spinning the camera around, Octane will only render every 4 (2x2) or 16 (4x4) pixels at a time making kind of a pixelated effect, but it will speed up navigation. Once we stop moving around, it will render like normal.
Viewport Rendering replaces the C4D perspective view with the Live Viewer. This is handy if we’re short on space. There’s also Full Screen mode which removes the menu bar and command bar to make a more streamlined window. In both cases, we can then go up to the Octane menu in the C4D menu bar and choose Octane Dialogue to get just the top part of the Live viewer (command bar, menu bar) and either dock that somewhere or use it to get out of Viewport Rendering or Full screen mode.
The Options menu is also where we’d go to turn on network rendering. The Octane subscription comes with a number of network nodes so we can set up a few other computers on our network with supported GPUs to help with rendering if we want.
GUI Menu
This allows us to turn on and off parts of the Live Viewer’s GUI. This is good if we’re working on a small screen or just like a super clean interface. We can also set the icons to a darker theme if we’re using a lighter C4D UI.
Right Click Contextual Menu
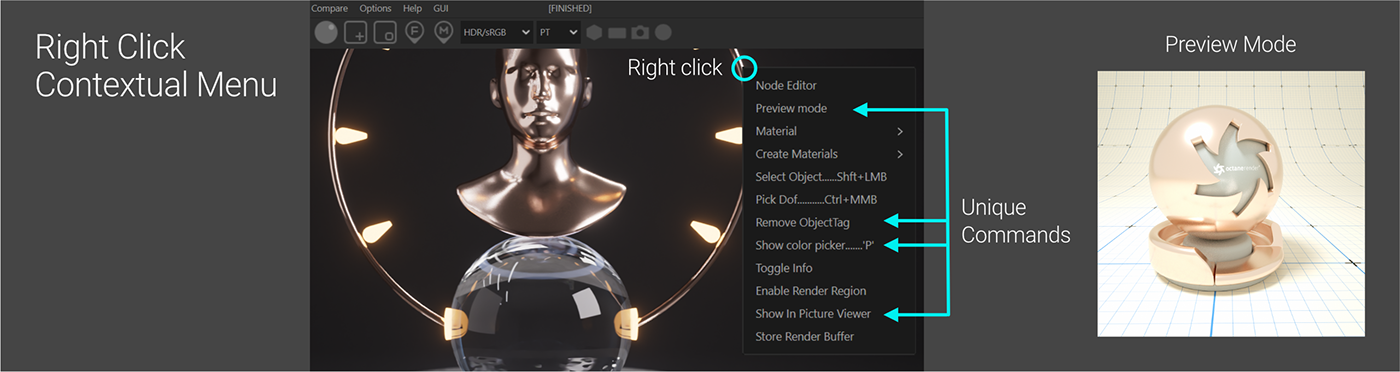
If we right click in the render area, we can access a bunch of shortcuts. There are a few unique commands here that can send the render to C4D’s Picture Viewer, pull up a color picker, remove an object tag, and go into Preview Mode which lets us work on a material on a shader ball.
Wrap Up
Hopefully you have a better understanding of all the things you can do with the Octane UI within C4D.
If you are new to Octane and haven’t read the Getting Started with Octane Render guide - that’s a good place to start, otherwise there are a ton more guides to explore all the various parts of Octane, and even a guide for all the guides to help you decide where to go next.
Author Notes
OG020 Live Viewer Deep Dive Version 1.0, Updated Feb 2024 using Octane 2023.1.2 and Cinema 4D 2024.2
This guide originally appeared on https://be.net/scottbenson and https://help.otoy.com/hc/en-us/articles/212549326-OctaneRender-for-CINEMA-4D-Cheatsheet
All rights reserved.
The written guide may be distributed freely and can be used for personal or professional training, but not modified or sold. The assets distributed within this guide are either generated specifically for this guide and released as cc0, or sourced from cc0 sites, so they may be used for any reason, personal or commercial.


